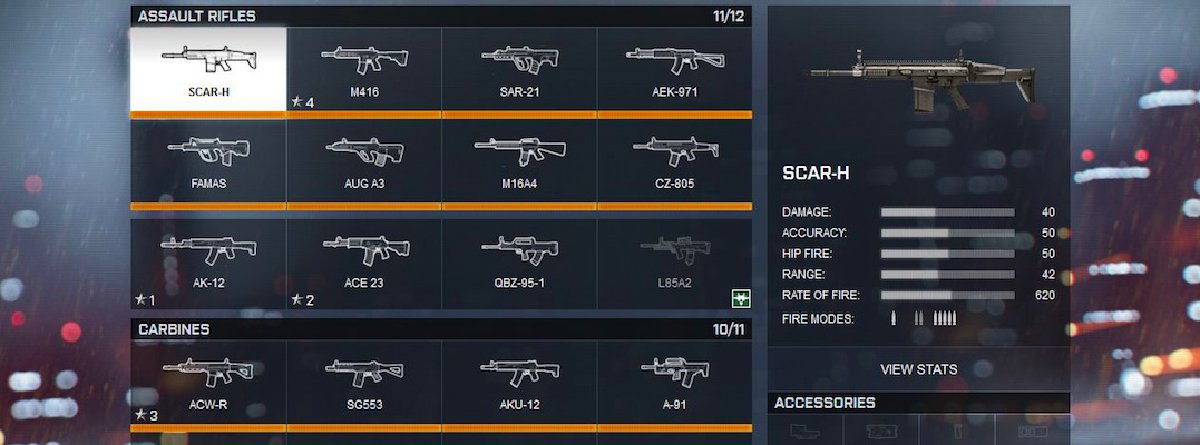
Veterans of the franchise will understand that Battlefield 4 is not your every day twitch shooter. Sure, you can log on and enjoy some fast-paced action in Team Deathmatch, Domination or Defuse, but mastering the infantry combat takes some commitment. This is an area where DICE stepped up its game from Battlefield 3. In order to make the best weapon decision for your play style, you must understand what each base statistic means. Check out our breakdown below.
Damage
This refers to the maximum damage a weapon can output at close range. It’s fairly self explanatory, but still has a few tricks up its sleeve. There is maximum damage, minimum damage and everything in between. Generally speaking, weapons that have higher damage ratings — such as the SCAR-H — have a lower rate of fire. Players will find that equipping Assault Rifles and Carbines that do high damage are most beneficial in medium to long range engagements. Since you should fire in bursts anyway, the lower rate of fire won’t negatively impact your chance of winning. The opposite is true of close quarters infantry combat. Damage shouldn’t carry as much weight on your weapon choice since you’ll be in more split second gun battles where rate of fire is everything.
Accuracy
This refers to the spread pattern when you aim down sight. This is a very difficult statistic to base weapon choice on. Bullet spreads can be up and to the right, up and to the left or even straight up and down for the most part. Like we said, not an easy statistic to understand. Look at the SCAR-H again. It has that low rate of fire we mentioned, but also high damage and accuracy. To simplify it for you, less shots can be fired per minute, but those shots do more damage and are more likely to hit their intended target. For the dedicated Battlefield 4 player, understanding the bullet spread of your weapon can definitely be beneficial, but it’s certainly not the most important statistic. No matter what spread pattern your weapon has, you’ll eventually adapt to it.
Hip Fire
The higher the value, the less bullet spread when not aiming down the sight. Simply put, this should be a non issue for the bulk of Battlefield 4 players. Hip fire should be considered with Shotguns, the PDW class and perhaps the LMG family for those epic multi-kill montage moments. If it plays an important role in most of your gun choices, you might struggle more than necessary. It should be noted that the PDWs have the highest hip fire ratings — besides pistols — in the game. This reflects the intent they be used in close quarters, split second gun battles where hip fire is effective.
Range
This refers to how far the weapon maintains its damage. Higher values mean higher damage at long range. As a general rule, the higher the damage of a weapon, the better rating it gets for range. Not to sound like a broken record, but the SCAR-H is again a perfect example. It boasts the highest damage and range in the Assault Rifle group. In fact, range and damage are important to consider together, rather than as individual statistics. For example, the SCAR-H does 34 damage up to eight meters, but then steadily declines until it levels off at 25 damage at 55 meters and beyond. Without factoring in multipliers for the damage — another article for another day — this essentially means that at a range of zero-to-eight meters, it takes three bullets to kill your opponent. At 55 meters and beyond, it takes four.
Stability
Stability refers to how easy the weapon is to control during rapid and automatic fire. Higher values make it easier to control. Much like hip fire, this is a statistic that depends on variables such as range. Players should not be using automatic fire in long range engagements. Use burst fire to control recoil. However, if you find yourself face to face with 10 opposing players in a narrow hallway, it might be time to put the hammer down. This is where stability really comes into play. For those up close and personal gun battles, look for weapons with a high rate of fire, hip fire and stability. Consider the MX4 from the PDW category as an example.
Keep in mind that these are only base weapon statistics, and can be drastically altered by adding the various attachments. It’s also worth noting these are the stats provided through Battlelog. Players interested in digging even deeper — such as reload times, damage over distance and weapon charts — should check out Symthic.
For more information on Battlefield 4, be sure to check out the Prima Games Official Strategy Guide. Check back tomorrow for a follow up piece on attachments and how they impact the base weapon statistics.


Published: Dec 2, 2013 6:00 PM UTC