Return to The Evil Within Walkthrough.
This chapter is a fairly linear experience, but at the same time it’s filled with lots of random traps that can end your life in a big hurry. To begin, simply move forward and do some exploring. Snatch up any supplies that you can until you go up a flight of stairs and are attacked by several enemies. Whip out your Shotgun and put them down with some well placed headshots, and If you are about to be overrun, just back up and put some space between you and them.
When you head back up the stairs and return to the hallway where you were attacked, there will be two torches at the far end. Look between them for the option to interact, using your knife to acquire the first Old Lithograph that you’ll need. In total there are three.
Tip: Once you go through the door that opens near the Old Lithograph and beyond, you can’t go back. If you want to explore further down the hallway, do so before you go inside.
Inside the room where you snagged the Old Lithograph will be some supplies. Gather them all up, including the Catacomb Note, then make your way forward. You’ll eventually come to a room with a giant stone statue in the middle and what looks like three spots for an Old Lithograph. Placing yours in the center slot will open up doors to your left and right.
Tip: In addition to the doors on the left and right is another door with a mirror or portal. This will allow you to save your game and purchase some upgrades. Don’t worry, you can return to this room several more times prior to the boss fight.
We opted to take the door on the left (when looking at the monument) first, passing through and into a corridor with several cells on either side. There are at least three enemies in this area, so take your time and pick them off with headshots, or sprint past them and let them trigger the traps that line the hallway. Just make sure not to set them off yourself. When the area is clear, loot all of the cells, and nearby rooms before moving on and climbing down a ladder.
The bottom of the ladder will introduce an oxygen meter in the top right of your screen. Turn the two valves in the room you’re in to make it go away, but at the same time be cautious of the lone enemy who is lurking about.
Climb down another ladder and keep making your way forward. There are more enemies to deal with, but it’s nothing that a Grenade or Explosive Bolt can’t take care of. With them gone, loot the corridor and then crank the wheel to open the next door. This will also close you off from everything behind you.
Watch out for the trap on the ground, but after disabling it keep making your way in the only direction that you can. There are at least three crawling foes up ahead, but rather than waste ammunition, just set them on fire with a Match as you continue forward. This will lead you to another crank that will close you off from the past and open up a door in front of you.
That’s the last of the opposition for this part. Just keep moving along and looting up until you go up a flight of stairs and find your second Old Lithograph. This will also take you back to the main monument. Put the Old Lithograph in it, save your game and then go through the door to the right.
Head forward to an area that has a trap that is triggered via a nearby lever. It isn’t really of much use, but there are several of these throughout the chapter so knowing how it works is handy. When you’ve looted the area, move forward, disabling the trip-wire and approaching another overhead hazard.
Look across the area to two wheels that look like they can be turned. Rather than approach and interact with them, shoot them. This will cause the trap to fall, then you can step on top of it to progress. Just be careful of the sneaky creature that is lurking about on top.
With the creature down and the trap having elevated you to an upper level, go through the nearby door and look around for a crawl space hidden behind a clay pot. Disable the trap on the other side, then turn the nearby valve to open the big iron gate.
Turning the valve will trigger several enemies to attack. You could go with explosives or bullets to kill them, but why not make use of the perfectly good overhead trap? Backtrack the way you came, drawing your enemies into the pit below the horrible spikes of death. When you have all or most of them in the kill zone, shoot the valve on the other side to send them to their doom.
With the area clear of all hostiles, once again approach the iron gate and turn the valve. You’ll have one more demon like freak to deal with, but when that mess is out of the way you can snag the third Old Lithograph and return to the area with the monument. Consider saving your game and upgrading your skills and gear before placing it in the third slot.
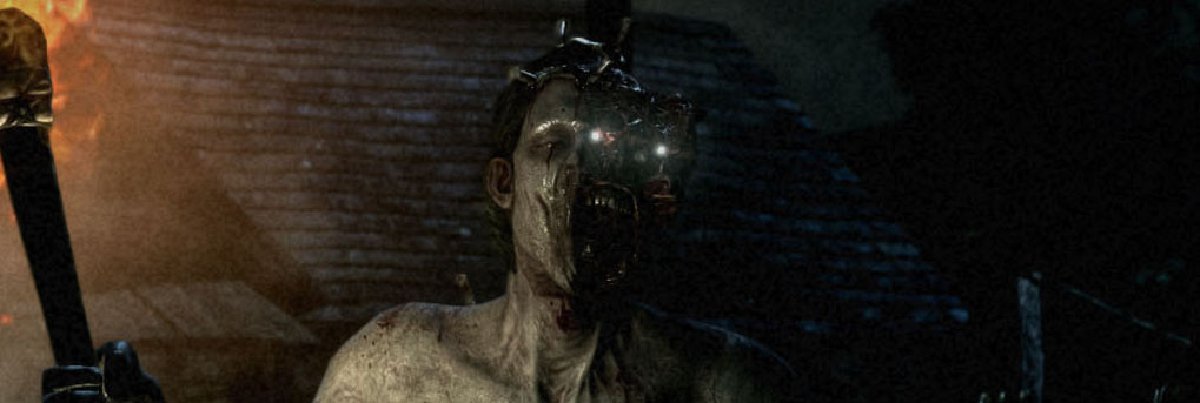
With the third Old Lithograph in place, it’s time for The Keeper boss fight. You might also refer to it as the Box Head boss fight. Either way, you’re about to throw down.
Following a short cut scene, make your way forward, sprinting through the corridor before the spikes can crush you, all the while avoiding the bear traps laying on the ground. This will reunite you with Leslie, and after breaking him out of the cell he’ll want you to turn a valve to open a nearby door. Of course, this will prompt Leslie run away from you, and that’s when the battle really begins.
Tip: You have to fight The Keeper several times, but killing him in each instance isn’t that hard. Hit the big lug with a Freeze Bolt, then follow up with the Sniper Rifle (to the body) to put him down. That should clear your path until you cross into the next area.
After dropping him for the first time, make your way into the next room and grab some loot off the nearby table. Exit into the main area and use the valve, prompting The Keeper to make his second appearance. This time out, just run away from him and through to the next area. This will actually shut him in and save you some precious ammunition.
Don’t think you’re getting off that lucky. He won’t stay dead that easily, and this time you have to kill him. Do as we told you and hit him with the Freeze Bolt and Sniper Rifle, then disable the nearby bear traps to acquire some precious parts. When you’re ready, make your way through the only open door and into the next area.
This guy is sick of your tricks, and after a few moments a cut scene will show him destroying a valve and messing with your oxygen supply. Quickly look for a side room that has a valve on the table, snagging it and heading back to the main area. Hit The Keeper with a Freeze Bolt, then replace the valve and use it to restore your oxygen supply.
With the valve in place, sprint past Box Head and through to the next area. Climb the ladder when you come to it, then follow the on-screen prompts to shake free of an attack. This will trigger another cut scene, this one ending the fight.
Make your way forward, turning left at some waterfalls and looking for a ladder. Climb down the ladder to trigger yet another cut scene, this one chapter ending.
Continue with The Evil Within – Chapter 8 – A Planted Seed Will Grow.


