This guide offers a walkthrough of the Smouldering Lake optional area in Dark Souls 3. This area is filled with Large Titanite Shards, making it a great stop if you’re trying to upgrade a few weapons. It’s also necessary if you want to continue the Anri and Horace the Hushed storyline and get the best ending. If you explore the area in full you’ll find an Undead Bone Shard, Estus Shard, Black Knight Sword, Izalith Pyromancy Tome, Quelana Pyromancy Tome, Dragonrider Bow, a Shield of Want and more! You can also face off against the giant Carthus Sandworm and the Old Demon King boss.
Smouldering Lake
Travel to the Abandoned Tomb bonfire and make your way through the cave ahead and into the Smouldering Lake area. There are several items in the water ahead, most of which are Large Titanite Shards. However, as soon as you step onto the water, a ballista will fire on you from above. If you move across the water to the far shore, a giant Carthus Sandworm appears. Don’t worry as you can quickly run past it and should not fight the beast yet because you still need to turn off the ballista.
Before you run past the Carthus Sandworm, on the far side of the water, to the right of the sandworm there’s a wall. The ballista can hit you from here, but stand in front of the wall and wait for the ballista to fire, then dodge. The shot from the ballista will break the wall and reveal and item.
Collect the Speckled Stoneplate Ring, then head just past the Carthus Sandworm to see a long staircase. This leads to the boss battle against the Old Demon King. If you want to fight him now, jump over to our detailed strategy on the fight, but we recommend completing the area before fighting the boss.
For now look to the right of the stairs to see a mountain path heading up the side of the cliff. Follow the path, collect the Large Titanite Shard at the end, then head down the stairs to the left. Light the Demon Ruins bonfire below and continue down the next flight of stairs. Before you enter the room ahead, there’s a Demon Cleric to the left and a Smoldering Ghru to the right. Use ranged attacks to draw them in one at a time and fight them in the hallway leading into the area (or you can run out and fight them together).
Whenever there’s a Demon Cleric nearby you will see large fireballs. If they spot you they will start shooting fireballs at you and the Demon Cleric will be alerted to your presence. It’s best to take them out with a couple arrows before you engage any nearby Demon Clerics.
To the left there’s a corpse holding an Ember. Collect the item then head in the opposite direction, past the stairs on the left and continue toward the end of the corridor. There are four Smoldering Ghrus patrolling the area if you haven’t already taken them out. These enemies are very similar to the three you faced in Farron Keep, with one creating a poison cloud while the others chase after you. Finish them off, but before you head down the stairs you passed before (ignore the second set of stairs by the enemies), look left to find two more Ghrus at the end of the next path.
These are Ghrus that will try to hug and jump on you so be careful of its higher mobility. Use ranged attacks to draw them out so you don’t have to face them both at once. Collect the Ember and look to the left to see another item across a small gap. This is an Estus Shard, but you can’t reach it from this direction. Head back to the area with the previous Ghrus and Demon Clerics and continue down the first staircase near the entrance to the room.
There’s another Demon Cleric patrolling at the bottom of the stairs. Take him down then look to the far left to see another one. Kill the Demon Cleric then continue down the left side of the corridor to find a hallway to the left and three Writhing Rotten Flesh in the far left corner. Ignore the hallway for now because you can’t do much there.
Two of the Flesh are on the ground while another is on the ceiling above an item corpse. These Flesh are a bit different than the ones you’ve faced in the past as they are not weak to fire and they will even shoot fire at you from time to time. Take out the Writhing Rotten Flesh, collect the Undead Bone Shard from the corpse, and head to the other side of the area.
The stairs on the other side lead up to the area you were just at with the Smoldering Ghrus. Beyond the stairs there are paths in the far right and far left corners. For now you want to go down the path in the far left corner, but remember this room with the Demon Clerics because you’ll be coming back to it later to take the other path.
Head through the corridor in the far left corner to find two Smoldering Ghrus waiting at the end, one that spits poison clouds. When you reach then end, another Smoldering Ghru waits to the far left, but if you attack the wall directly ahead it reveals a room with a knight and a Smoldering Ghru. Take out the knight and his friend first, then collect the Black Knight Sword on the right side of the room.
Go down the other hallway to find Smoldering Ghrus and Stone Demons in the next room. Use ranged attacks to find them individually. The Stone Demons breathe fire, so keep your distance or get behind them if they pause and turn their head. Kill the enemies then continue through the archway and into the next room to find more Smoldering Ghrus.
Straight ahead are stairs leading up and in the far left corner of the room there’s a hallway with another Smoldering Ghru at the end. This hallway circles around to the same room, right next to the stairs. Finish off the enemies, then head up the stairs and light the Old King’s Antechamber bonfire at the top.
Continue down the hallway to the right of the bonfire and kill the Demon Cleric. There’s a room ahead and a hallway to the right. Go down the hallway and around the corner to find a Crystal Lizard. Slay the enemy to obtain a Chaos Gem, then head back around look in the next room to see a poison-spitting Smoldering Ghru.
Just as you enter the room a Smoldering Ghru on either side of the entrance will attack, so use ranged attacks to draw the poison-spitting enemy out so you don’t have to deal with all three at once. Kill the enemies, then collect the Izalith Pyromancy Tome, then head back to the room with the bonfire. In the far corner there’s an archway in the wall. Attack the wall here to reveal a hidden path, then continue down the hallway beyond.
Going straight ahead leads to the large room with the Demon Clerics. Take the hallway to the left and remove the Writhing Rotten Flesh lining the ceiling. Collect the Estus Shard at the end of the hall to complete this small portion of the Smouldering Lake. At this point you should head back to the room with the Demon Clerics and continue down the other pathway you passed before.
Head down the corridor in the far right corner of the room with the Demon Clerics and kill the Hound-rat. There’s a hallway to the right approximately halfway down the corridor. At the end of the hallway is a small room with three Hound-rats. Kill the enemies, then attack the wall straight ahead from the hallway to reveal a hidden path.
Head to the end of the hidden path to find a Quelana Pyromancy Tome to the left. Collect the item, and ignore the stairs to the left. They lead to an area with lava anda few Writhing Rotten Flesh that is difficult to traverse. If you gear up with quite a bit of fire resistence and use your Estus Flasks you can collect the Toxic Mist and White Hair Talisman in the lava, but do so at your own risk. Head back to the room with the Hound-rats and continue the archway. There’s another Hound-rat to the left and stairs to the right. Kill the enemy, then head down the stairs.
Continue right to find more stairs to the left, but before you head down, at the far right end of the next room there’s a Large Hound-rat and five smaller Hound-rats. Use a ranged attack to draw in the Large Hound-rat first, then take out the smaller ones. About halfway through the room there’s a hole in the ceiling. Just before the hole you can attack the wall to the left to reveal a hidden room. Inside the room is a chest that holds three Large Titanite Shards.
Collect the loot then head down the stairs you passed before. In the next room are half a dozen toads. Use ranged attacks to separate the enemies so you can take them down easier and make sure to avoid their mist so you don’t get cursed and die instantly.
Pick up the Titanite Scale in the room, then continue toward the stairs on the far side. There’s another item corpse on a ledge by two toads, but you can’t access it from here. Before you head up the stairs, there’s a small corridor to the left. If you go down this corridor you encounter Knight Slayer Tsorig.
Tsorig uses an ultra greatsword and inflicts significant damage, but he has a lot of wind-up on his attacks. Avoid his attacks then quickly move in to attack a few times yourself before backing away again. Kill Tsorig and collect the Knight Slayer’s Ring, Fume Ultra Greatsword and Black Iron Greatshield he leaves behind.
If you continue down the stairs in the corridor where Tsorig appeared you will come to a pool of lava with two item corpses. If you risk the lava the only significant item you will find is a Sacred Flame, but once again you will need to use quite a few Estus Flasks and should have a considerable amount of fire resistance. Even with these precautions taken, it can still be dangerous to collect the item.
Head up the stairs you passed before to find a bridge with a Crestfallen Knight at the end. Like many other knights it’s best to circle around this enemy so you can get a back stab after he attacks. Try not to fight on the bridge so you don’t have to worry about falling off.
Kill the enemy then collect the Soul of a Crestfallen Knight in the far corner and head through the opening on the far side. Continue up the ladders ahead to find yourself near the ballista when you reach the top. Look to the right to see a ledge below with an item corpse. Drop down and collect the Dragonrider Bow, then drop down to the section between ladders and climb back up to the top.
There’s a large stone pillar blocking the ballista shots, but it only covers you so much. Be careful when you have to move beyond the coverage of the pillar. Head to the left and move down to the lower area to find an item corpse that holds two Homeward Bones. You are mostly covered from ballista fire in this lower area as you make your way down the path. At the end of the path there are two Skeleton Wheels to the right and several Skeletons to the left. Take out the Wheels first, then the normal Skeletons.
To the right of the normal Skeletons are two Skeleton Swordsmen, one who uses poison darts. Take them down then pull the lever directly under the large ballista ahead. This stops the ballista from shooting so you can collect all of the loot down below and kill the Carthus Sandworm.
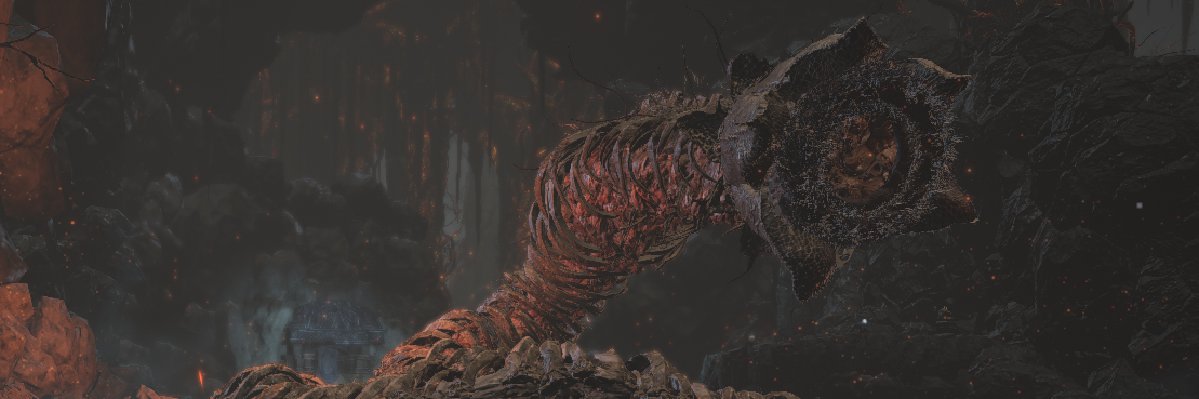
Kill the Carthus Sandworm
With the ballista taken care of, travel back to the Demon Ruins bonfire and head down to where the Carthus Sandworm spawn. If you haven’t unlocked that bonfire, go to the Abandoned Tomb bonfire, run across the water and behind the Carthus Sandworm. Just behind the sandworm is a plot of land that’s slightly off-color compared to the surrounding area. This is a safe spot where the Carthus Sandworm cannot attack you, and it’s pivotal to making this a very easy battle.
All you need to do is stand at the safe spot and wait for the sandworm to make a move. The sandworm will take on one of two positions. It will either curl up or raise only its head from the ground and fire off a blast of lightning. In either case, run forward and strike the enemy several times. Back away and return to the safe spot as soon as it starts to move again. Once you get the timing down you may want to back away just before it starts to move to make sure you avoid taking any damage. All you have to do is repeat this process until the enemy dies and you shouldn’t take any damage at all.
Kill the Carthus Sandworm to obtain a Lightning Stake miracle spell and an Undead Bone Shard, then collect the Large Titanite Shard and Shield of Want from the item corpses beneath the Carthus Sandworm.
Kill The Giant Crabs and Collect Loot
Once the ballista is down you are free to roam the lower area by the water. Quite a few giant crabs patrol this area. If you use ranged attacks you can easily draw then out one at a time to clear the area so you can collect some loot.
The item corpses on the water that you can access without interacting with the crabs are all holding Large Titanite Shards. Kill the giant crabs in the far left corner and collect the Chaos Gem on the nearby corpse and you will have all of the loot in this watery area (assuming you collected the Speckled Stoneplate Ring before turning off the ballista).
Defeat Horace the Hushed
From the Abandoned Tomb bonfire, if you hug the right wall after hitting the water in Smouldering Lake, you’ll come to a hallway in the rock. Continue down the hallway and up the stairs.
There are two Crystal Lizards ahead that drop a Twinkling Titanite and Titanite Chunk respectively. Collect the loot and continue to the end of the path to find Horace the Hushed waiting for you.
Unfortunately there’s no reasoning with Horace and he attacks as soon as you get close. He uses a halberd, which has good range. Stand back a bit and wait for him to thrust a few times, then quickly move in and attack. If you have a fast weapon you can keep him stunned until your stamina is low. Dodge away and repeat the process and you shouldn’t have much trouble with Horace. The is simply keeping your distance and attacking when he’s done with his series of attacks.
If you do have trouble against Horace, stay back and use ranged attacks, running anytime Horace gets close. It will take considerably longer to finish off Horace, but it’s an easier method if you have trouble with a more direct engagement.
Kill Horace the Hushed and he drops a Llewellyn Shield. Collect the two Yellow Bug Pellets from the item corpse on the side of the room, and the two Large Titanite Shards from the corpses on either side of Horace’s starting position. Head back to the main water area to continue with the rest of the Smouldering Lakes area if you haven’t already, otherwise continue on to the boss battle against the Old Demon King or head back to our full Dark Souls 3 walkthrough and guide.


