


Dragon Ball: Sparking! ZERO has been out for a week, and while it’s an absolute blast, the game isn’t without its quirks—like the lightweight tutorial that leaves out some critical info about the HUD. If you’ve found yourself wondering what’s what on your screen, don’t worry – we’ve got your back! Let’s break down the HUD (heads-up display) so you can focus more on winning and less on figuring things out.
Dragon Ball: Sparking! ZERO – What is the HUD?
The HUD is your in-game user interface, displaying vital info you need to manage your character and strategy. Think of it as your battle command center, showing everything from health to Ki, Skill Points, and more. Here’s how to read each part of the Dragon Ball: Sparking! ZERO HUD and use it to your advantage.

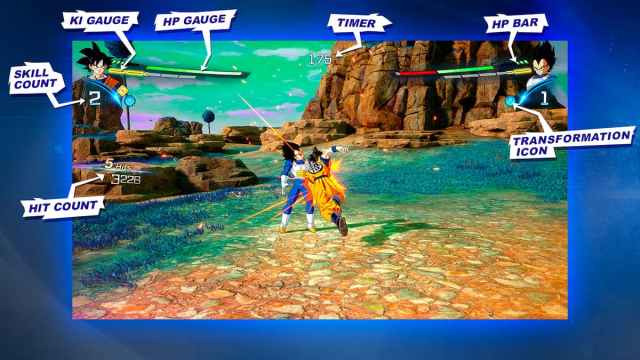
HP Gauge
The HP Gauge shows how much health you or your opponent has left. Simple enough: get hit, your HP drops. Once your HP hits zero, it’s game over. The gauge changes color from blue (high health) to orange (low health), so you can easily gauge the danger zone.
HP Bar
The HP Bar corresponds with your HP Gauge and shows the number of health layers you have. The colors of both bars match, giving you an instant idea of how close you or your opponent is to defeat.
Ki Gauge
The Ki Gauge measures your energy (Ki) for special attacks, like beams and dashes. You can build up Ki by charging it manually or by landing hits on your opponent. When your Ki Gauge is full, you start filling up your Sparking! Gauge, which lets you unleash powerful combos in Sparking! Mode. Be mindful—activating Sparking! Mode costs a Skill Point, but more on that below.
Related: How to Make Easy Zeni in Dragon Ball Sparking ZERO
Skill Count
Skill Count represents Skill Points, which power up your character’s transformations, fusions, Sparking! Mode and special moves. You earn Skill Points by filling the curved blue bar next to the number of available points. You can also charge Ki to fill the curved bar and build up these points.
Transformation Icon
The Transformation Icon shows how many transformations your character has available. You’ll need Skill Points to transform. For example:
- Goku → Super Saiyan 1 = 1 Skill Point
- Goku → Super Saiyan 2 = 2 Skill Points
- Goku → Super Saiyan 3 = 3 Skill Points
Reverting back to your base form doesn’t cost any points, but to transform again, you’ll need to recharge those Skill Points.
Switch Icon
The Switch Icon lets you rotate between your team members. You can have up to five characters on your team (1 active, 4 in reserve). The switch ability has a cooldown, so plan your swaps wisely.

Hit Count
The Hit Count tracks how many hits you’ve landed in a combo and the total damage dealt. Keep an eye on this to maximize your combo potential and rack up the damage.
Timer
The Timer counts down the time left in the fight. For a single-fighter match, the timer is set to 300 seconds, while multiple-fighter matches give you 600 seconds to win.
And there you have it—the complete breakdown of the HUD in Dragon Ball: Sparking! ZERO. Now that you know what’s going on, jump into the fray, unleash your power, and show the universe who’s boss!

